Create Role
14. 01. 2025
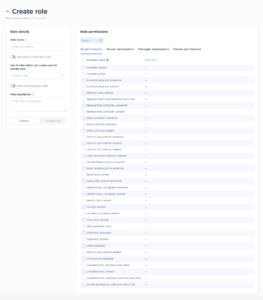
The “Create Role” page is an integral part of a system’s administration panel, designed to help Service Users define and allocate specific permissions to various roles within an organization. Here’s a detailed guide on how to navigate and utilize this page:
Overview of the “Create Role” Page:
- Role Details Section:
- Role Name: Input field for specifying the name of the new role.
- Allowed to Create New Roles: Checkbox that enables Service Users in this role to create new roles, which is essential for administrative or high-level management roles.
- List of Roles which can Create Service Users in Current Role: Dropdown menu to select which existing roles are authorized to create Service Users with the new role.
- Allowed to Manage Roles: Checkbox to allow Service Users in this role to manage (edit or delete) roles within the system.
- Role Description: Text field for entering a short description of the role’s responsibilities or permissions.
- Role Permissions Section:
- Search Bar: Allows for quick filtering through the list of permissions based on keywords.
- Permissions Tabs: Organized into “All Permissions,” “Owner Permissions,” “Manager Permissions,” and “Viewer Permissions” to simplify the assignment of permissions based on common role categories.
- Permissions List: Each permission has a checkbox and typically includes a brief description. Permissions might include actions like managing transactions, viewing reports, modifying user profiles, etc.
Steps to Create a Role:
- Enter Role Details:
- Type the name of the role in the “Role name” input field.
- If applicable, select the checkbox for “Allowed to create new roles.”
- Choose which existing roles can create Service Users in this new role from the dropdown menu.
- If the role should have permissions to manage other roles, select the “Allowed to manage roles” checkbox.
- Provide a brief description of the role in the “Role description” box.
- Assign Permissions:
- Use the search bar to quickly find specific permissions.
- Select the relevant permissions for the role by checking the boxes next to each permission under the appropriate tab (Owner, Manager, Viewer, etc.).
- Create the Role:
- Once all details and permissions are correctly filled in, click the “Create role” button to save the new role.
- Use the “Cancel” button to discard changes if you decide not to create the role at this time.