KYC via SumSub integration
General Info
Intro
Integration with SumSub as a KYC service provider is implemented in the SDK core applicatoin.
The set of basic external provider APIs to perform Customer document verification checks were implemented. Also, the set of internal SDK APIs for changing users identification status according to the verification results inside the SDK system was extended.
So the SDK system implemented the technical integration with basic features of SumSub User Verification API for User document verification and AML Screening and Monitoring and embedded it into the onboarding process within the SDK system. All features that will be available from the vendor (SumSub) to the client (for both, the source code or cloud clients) depend on the client’s needs and their agreements with the vendor. On the SDK side, here is a quick way to integrate with the provider from the SDK system.
How it works
User Document Verification
The user of the SDK platform provides user profile data and uploads the documents to the front-end app (web or mobile). The Compliance Manager within the SDK system initiates document verification via 3rd party KYC service provider. The SDK submits user data to Kafka`s topic. After the SDK platform reads the topic, processes the data, and passes it to SumSub via provider REST APIs. When the response from the provider is received SDK platform make additional call to SumSub to clarify status for each document. calls SDK APIs to change the status of the user document and identification (according to the response from the provider) and create notes about the user with provider response details.
The current solution allows us to change the configuration for integration or extend functionality by modifying current implementation in the Core SDK application.
AML Screening and Monitoring
In this scenario, the AML screening is performed via SumSub, but there also should be a provider as a source of data (watchlists for checking). Comply Advantage is a watchlist screening provider used by Sumsub to provide real-time sanctions and watchlist screening using global lists and other governmental, law enforcement, and regulatory databases.
In the test environment, we support a Document-based AML check scenario. In this scenario, the name and date of birth are extracted from the identity document that was uploaded by the user during the document verification flow.
The results of the AML check are available In the Watchlists section of the applicant profile in the SumSub account (with all statuses, various metrics, and details). Where you can interpret and manage screening results and applicant’s statuses.
The SumSub offers a variety of AML check options that can be configured through a SumSub account. For more detailed information visit the provider’s website.
On the SDK side, we provide an ability for the Сompliance Manager to change user statuses (manually) according to the result of the AML check. And also to notify the user about changes in his status and the need to provide additional documents for AML checking.
General Schema of integration
Supported operations
!! Note, that all features that will be available from the vendor (SumSub) to the client (for both, the source code or cloud clients) depend on the client’s needs and their agreements with the vendor (SumSub).
The SumSub KYC integration service in the SDK platform supported basic methods of the User Verification API for User document verification and AML Screening and Monitoring (SumSub user verification API documentation). The supported methods of this integration can be easily extended according to the business requirements after elicitation.
Flows supported on the Test Environment
Document Verification
There are two modes to perform user document verification: Automated and Manual
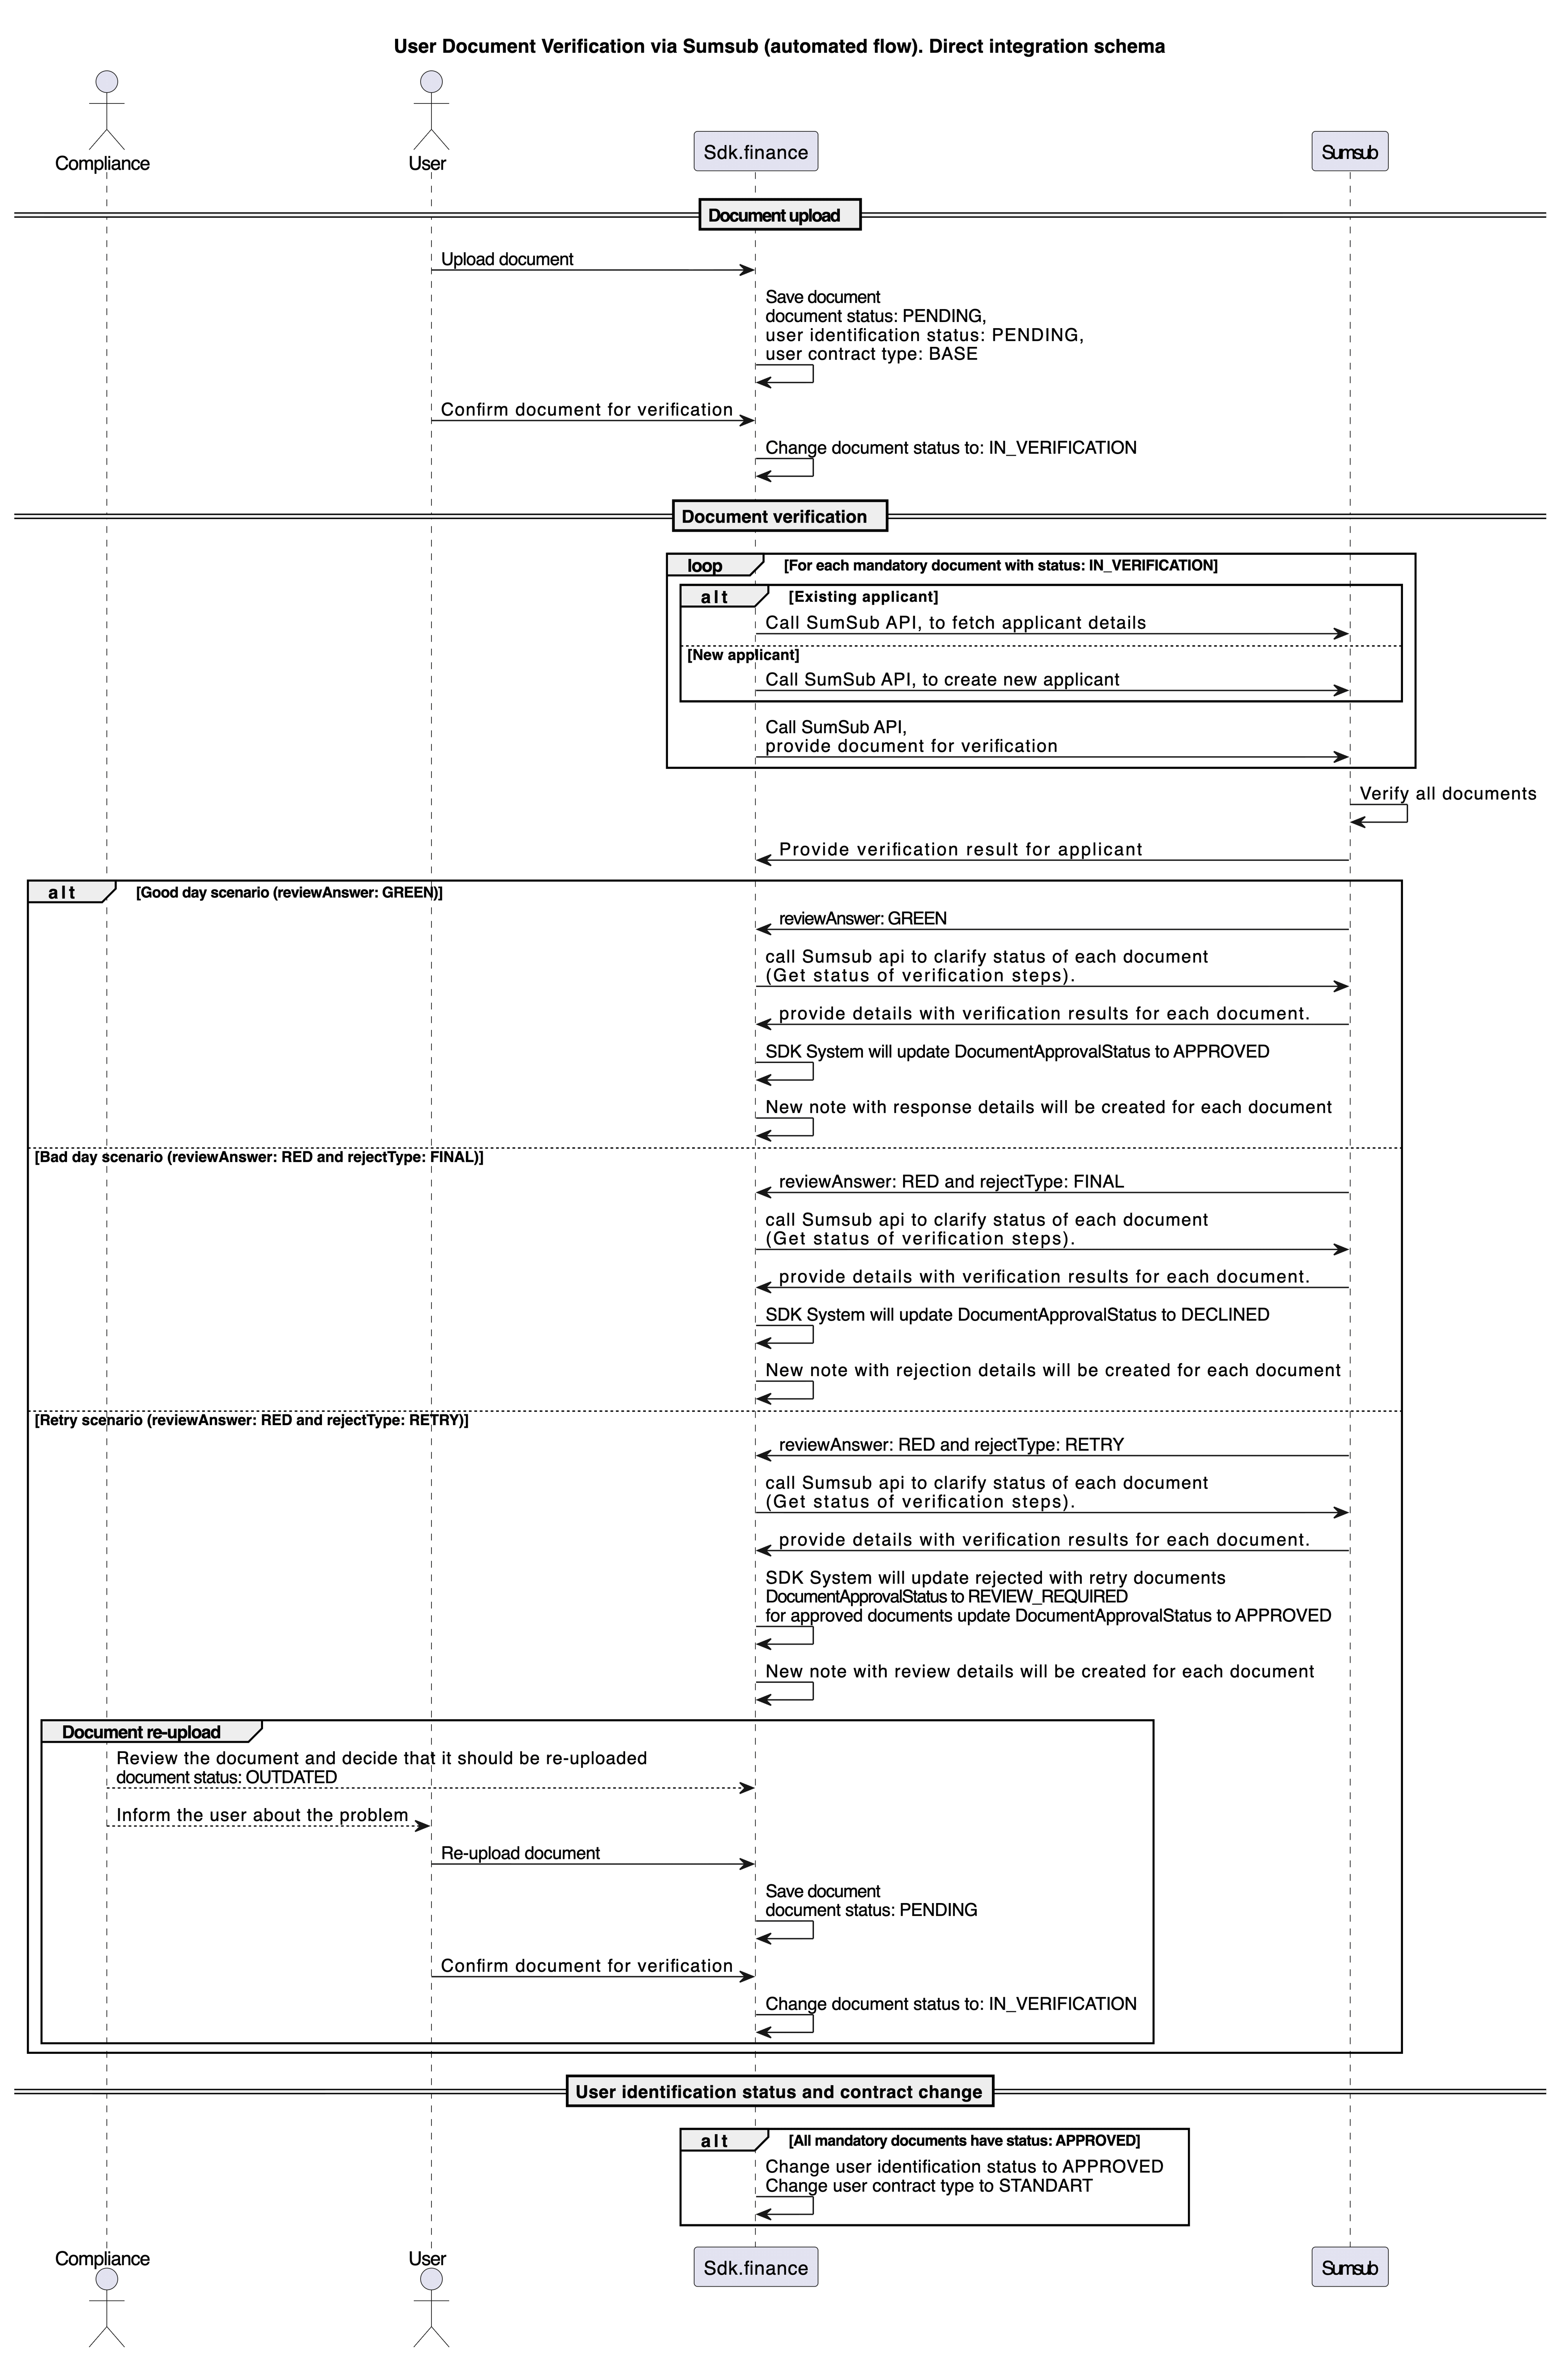
Automated
In such flow documents will be sent for verification to the provider automatically immediately after the user uploads the documents and confirms the upload during the KYC procedure. After the provider response, the System will automatically change the user document status and user identification status due to verification results.
User flow for ID document verification while onboarding:
-
The User uploads identification documents during the onboarding process in SDK (user document status is IN_VERIFICATION, user identification status is PENDING, user contract type is BASE)
-
The System submits the User documents (one by one) to Sumsub for verification
-
The System receives verification results from Subsub (for each document separately):
-
GREEN – user document status transit to APPROVED, user identification status transit to APPROVED (if all required documents were approved), user contract type transit to STANDART automatically. Notes with details review will be created for each document
-
RED (final) – user document status transit to DECLINED, user identification status is PENDING, user contract type is BASE. Notes with rejection reason will be create for user and each document
-
RED (retry) – the system shows the Compliance manager the issues with the user`s documents that can potentially be solved. Document will be updated to status REVIEW_REQUIRED. Notes will be created for documents with the reason why it was requested for resubmission. Compliance informs the user about the problem, for example: “The text on your identity document is not clearly visible. Upload a new photo” (communication with the user outside the system OR via email notification generated by the system). The document should be changed from REVIEW_REQUIRED to DECLINED. The user re-upload documents and the system runs the check via Sumsub again (user reuploaded document status is PENDING, user identification status is PENDING, user contract type transit is BASE till update from the Sumsub)
User contract type determines whether certain operations in the system are available/unavailable to the user. Before verification, the user’s contract type is BASE, which will limit his actions. After successful verification, the user’s contract type will be changed automatically to STANDART – giving him access to other operations in the system.
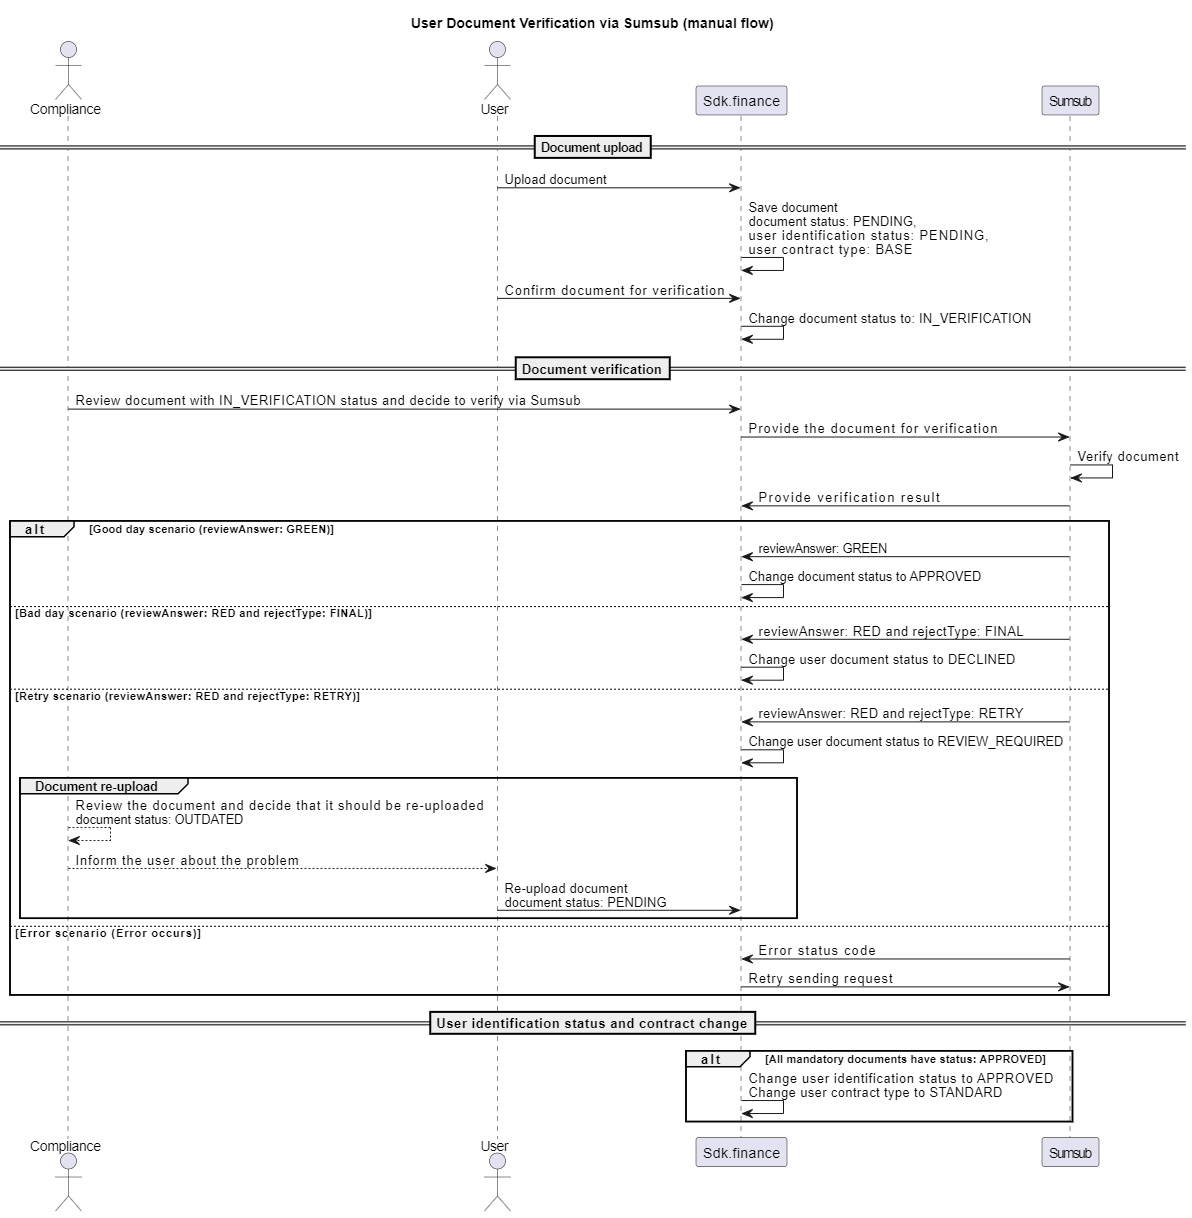
Manual
The Compliance Manager submits user documents for verification to the SumSub KYC service provider on-demand as a part of KYC process. After the provider response, the System will automatically change the user document status and user identification status due to verification results.
AML Screening and monitoring
Document-based AML verification occurs on the provider side after the user submits the documents for verification to the provider. The name and date of birth are extracted from the identity document is matched against a comprehensive set of watchlists in order to find/exclude a match.
The Compliance Manager sees the results of the AML check applicant profile in the SumSub account and manually changes the SDK user status according to it (block or freeze the SDK user account if needed).
Business process and APIs flow
Integration setup
As a Platform Owner:
-
Sign an agreement with the SumSub provider (to get access credentials)
-
Register at the SumSub system (to generate your API key and manage checks configuration)
-
For AML screening availability sign an agreement with the Watchlist source provider (Comply Advantage or World-check one) to get access credentials. Register at the Watchlist source provider system (to generate your API key). Configure AML checks in your SumSub account using credentials gained from the Watchlist source provider.
As an Administrator of the platform:
-
Check in the SDK Core configuration the availability of the SumSub Integration Service in the configuration file and other environment variables according to the required business flow
-
Set
api-keysthat was generated via SumSub back-office (SumSub application token for authentication, SumSub secret key for API authentication, Secret key for webhook signature validation) -
Check Kafka instance availability
!! There are preliminary steps that must be done as part of integration settings before the checks via the KYC service provider will be performed by the Compliance Manager.
Initiate the manual document verification via SumSub KYC service provider from the SDK platform
I. As a Business User:
-
Provide user profile data (via UI or API) !! at least User name (First, Last), Year of berth, Сountry must be provided to perform KYC checks
-
Upload identification documents for verification (via UI or API)
-
Check uploaded documents and confirm sending for verification !! after documents are uploaded and confirmed, the user
DocumentApprovalStatus=IN_VERIFICATIONandOrganizationStatus=pending
II. As a Compliance Manager (after the User uploads documents during the onboarding process):
-
The Compliance Manager reviews the user’s documents and decides to verify them via a 3rd-party service provider (via UI or API)
-
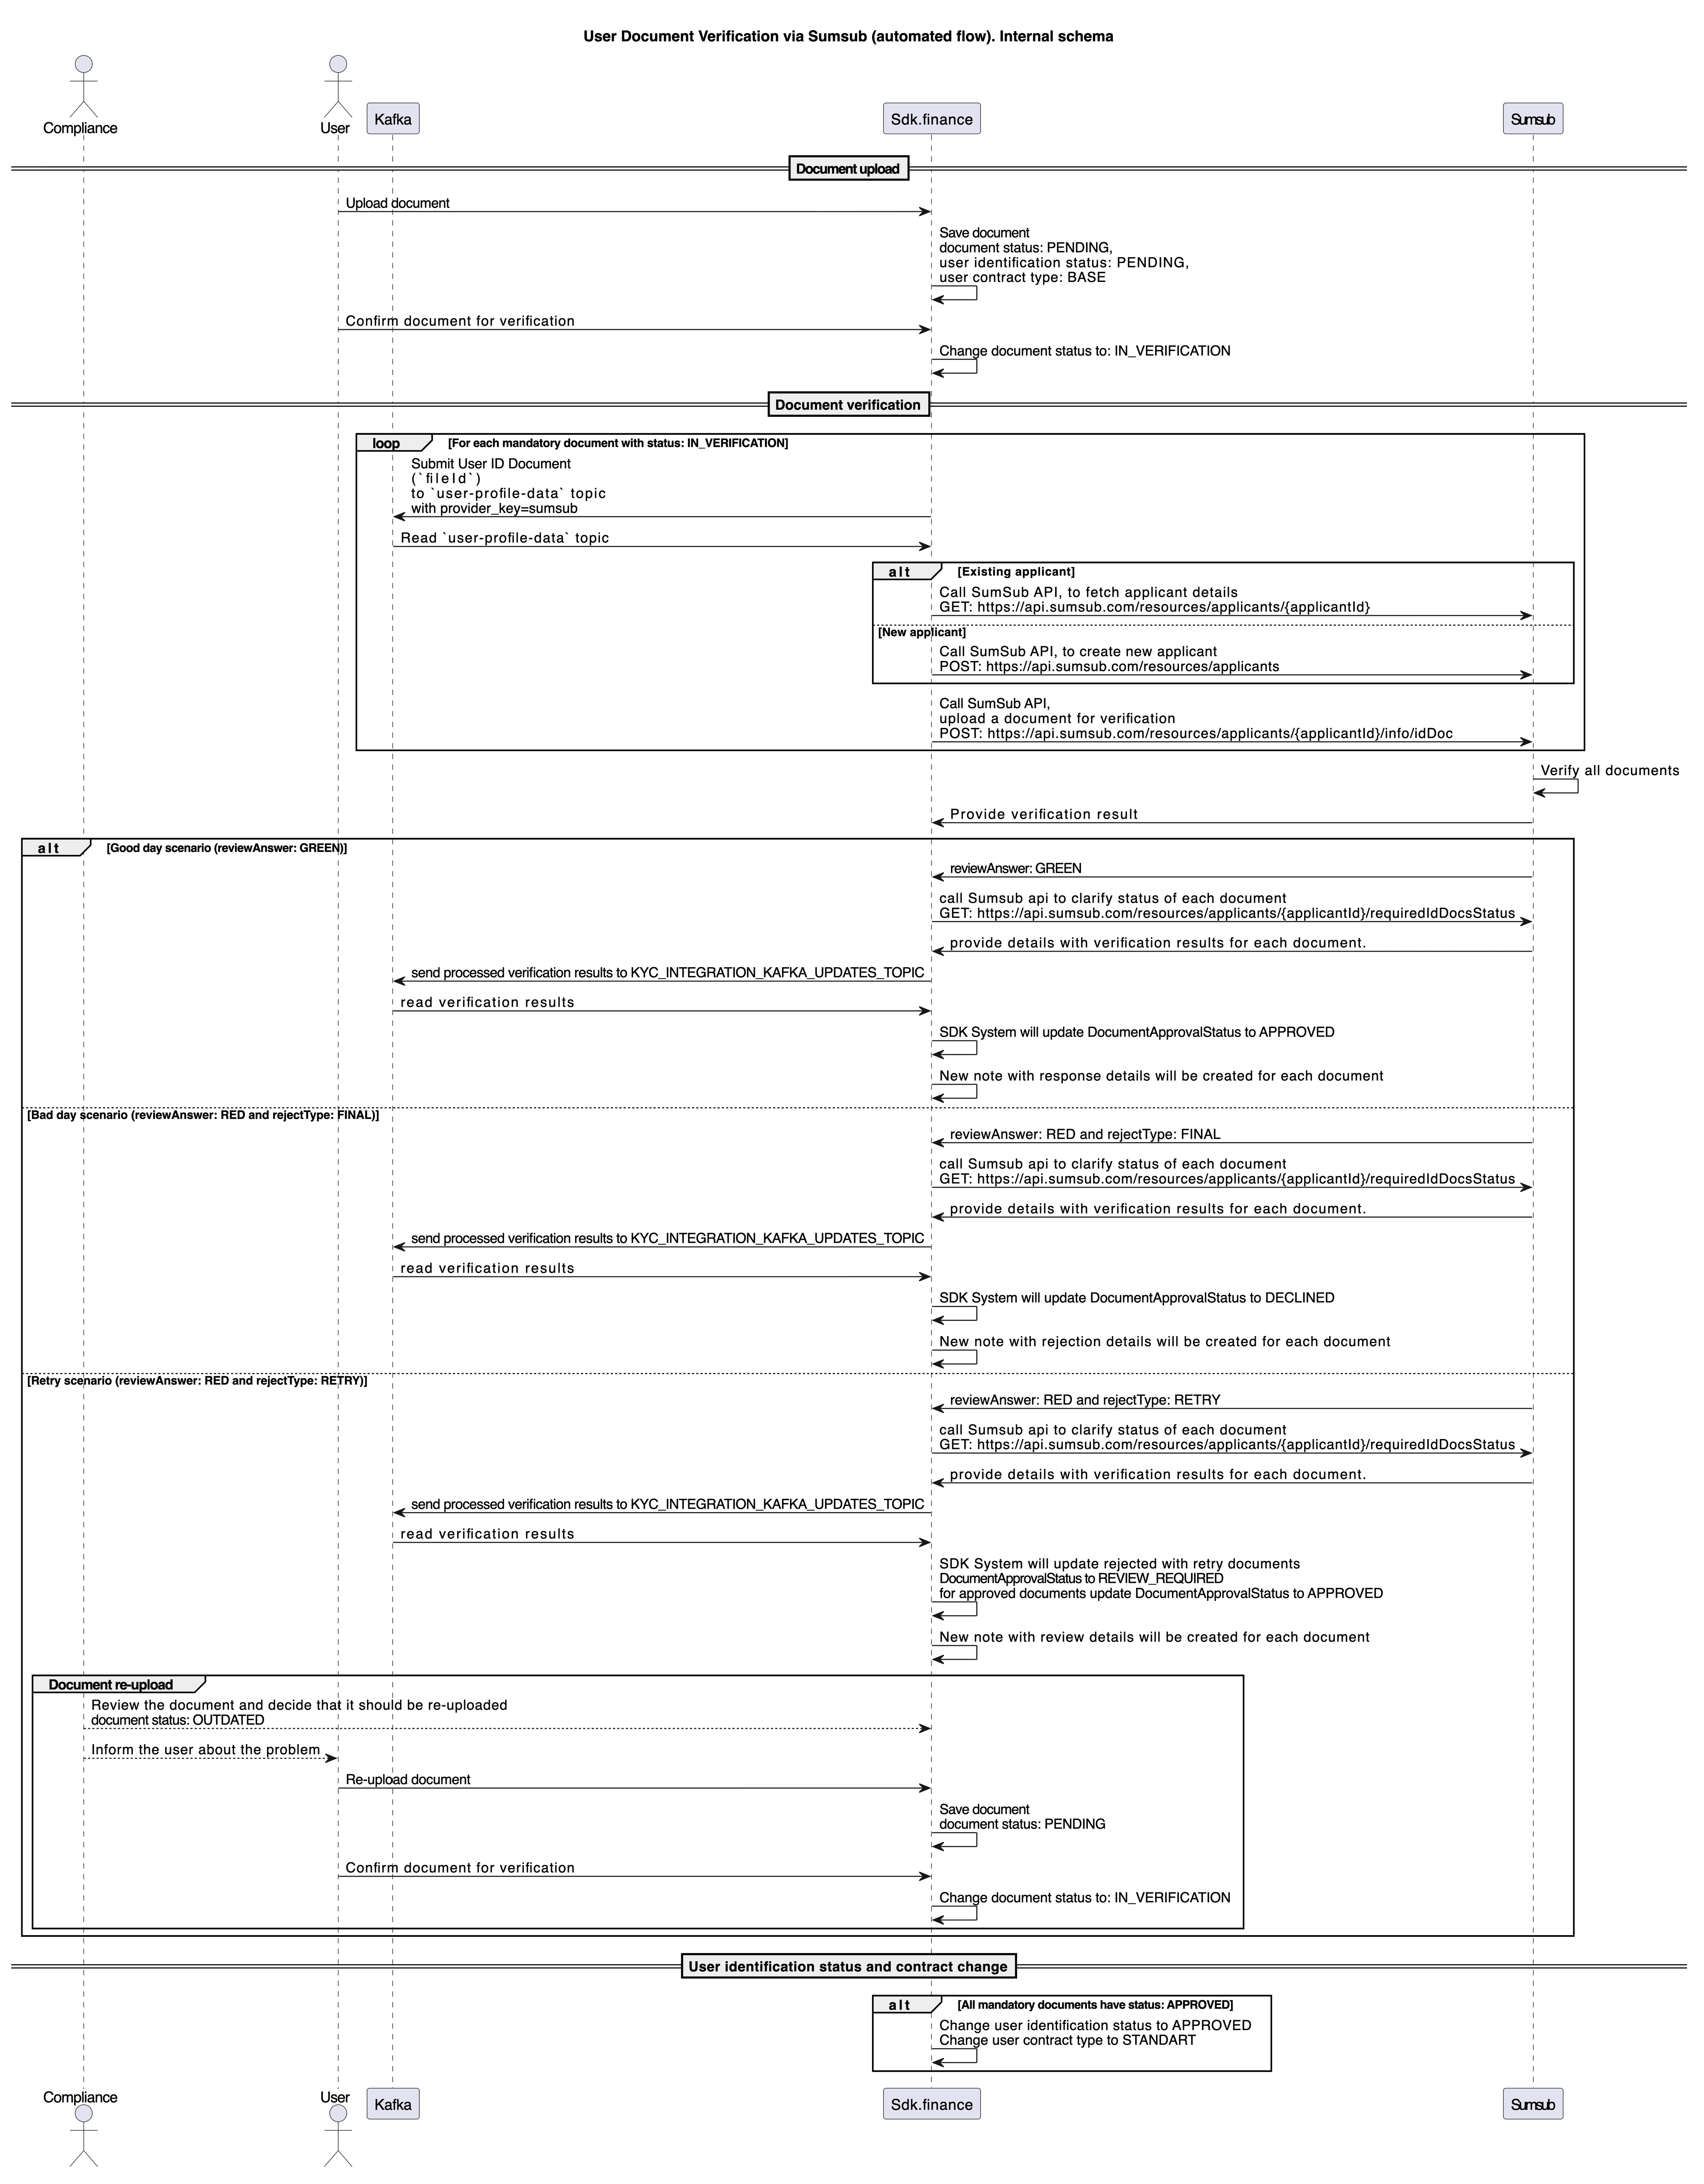
The SDK System submits the Document ID to the Kafka topic user-profile-data, if all conditions are satisfied (see required conditions below)
-
The SDK System reads the document IDs from user-profile-data and uploads the document file from S3 storage.
-
The SDK System passes document files to the provider via API for verification
-
After the callback from the provider is received (applicant verification) the SDK System call Sumsub api to clarify status of each document. Processed results with verification details submits to topic (KYC_INTEGRATION_KAFKA_UPDATES_TOPIC). SDK System will change user document and user identification statuses according to results. Notes with details will be created for each document.
MANUAL FLOW required conditions to submit user documents for verification via 3rd third-party provider
-
API POST /profile-documents/{profileDocumentId}/users/{userId}/verify?providerKey=sumsub is received
-
property
document-verification:sumsub-is-enabled: true -
DocumentApprovalStatus=IN_VERIFICATION -
OrganizationStatus=Pending
if all conditions are satisfied the system submits the user document IDs to the topic user-profile-data (see topic structure)
SDK System behavior depending on the provider verification results
-
if the reviewAnswer=GREEN – SDK System will update
DocumentApprovalStatustoAPPROVED, New note with response details will be created for each document -
if the reviewAnswer=RED and rejectType=FINAL – SDK System will change
DocumentApprovalStatustoDECLINED, New note with rejection details will be created for each document -
if the reviewAnswer=RED and rejectType=RETRY – SDK System will change
DocumentApprovalStatustoREVIEW_REQUIREDNew note with review details will be created for each document
The SDK System changes DocumentApprovalStatus and OrganizationStatus according to APIs.
Initiate the automatic document verification via SumSub KYC service provider from the SDK platform
For a business user, the flow of verification in automatic mode does not change – the documents will be sent for verification to the provider in the same way, but without the Compliance Manager’s involvement.
After the user uploads and confirms documents (DocumentApprovalStatus=IN_VERIFICATION and OrganizationStatus=pending) they will be sent for verification to the Kafka topic user-profile-data automatically if all conditions are satisfied (see required conditions below).
AUTOMATED FLOW required conditions to submit user documents for verification via 3rd third-party provider
-
property
document-verification:auto-enabled: true -
property
document-verification:provider-name: sumsub -
property
nt-verification:sumsub-is-enabled: true -
DocumentApprovalStatus=IN_VERIFICATION -
OrganizationStatus=Pending
!! For AUTOMATED FLOW SDK System behavior depending on the provider verification results the same as for manual.
AML checks via SumSub KYC service provider from the SDK platform (ComplyAdvantage as watchlist source is used)
I. As a Business User:
-
Provide user profile data (via UI or API) !! at least User name (First, Last, Middle), year of berth, country and Company name (for Merchant users) must be provided to perform KYC checks
-
Upload identification documents for verification (via UI or API)
-
Check uploaded documents and confirm sending for verification !! after documents are uploaded and confirmed, the user
DocumentApprovalStatus=IN_VERIFICATIONandOrganizationStatus=pending
II. As a Compliance Manager (after the User uploads documents during the onboarding process):
-
Reviews the user’s documents and decides to verify them via a 3rd-party service provider manually OR documents were sent to the verification automatically in case of automated mode in on.
-
The SDK System submits the Document ID to the Kafka topic user-profile-data, if all conditions are satisfied (see required conditions below). The SDK System passes documents to SumSub as described above.
-
In case the AML check is configured on the SumSub account the SumSub system performs check according to the configuration. In the test environment, the Document-based AML verification is available. Document-based AML verification occurs on the provider side after the user submits the documents for verification to the provider. The name and date of birth are extracted from the identity document is matched against a comprehensive set of watchlists in order to find/exclude a match.
-
Compliance Manager sees the results of the AML check applicant profile in the SumSub account and manually changes the SDK user profile status according to it (API PATCH /v1/users/{userId}, to block pass
"paramType": "ACTIVE", "paramValue": trueor to freeze ==pass=="paramType": "FROZEN", "paramValue": true,). -
Compliance Manager changes the user identification status in SDK according to the AML verification result (if needed) and requests from the user required documents for further AML verification procedure (API PATCH /v1/profiles/{userId}?notify=true and provide
"requiredDocuments"to send a notification to the user with a list of required documents). Compliance Manager can change user identification status only according to user identification status transition
III. As a Business User:
-
Receives notification about account profile status and identification status changes according to Compliance Manager action. Available action will depend on the profile and identification statuses.
![]() See available action for user depending on the profile status and user identification status
See available action for user depending on the profile status and user identification status
User notification
User Account blocking
Subject: Notice of Account Termination Due to AML Compliance
To: User contact email
Message:
Dear [Customer's Name],

Following a review, we regret to inform you that your account with [Application Name] has been terminated due to compliance

with our Anti-Money Laundering (AML) policy. To facilitate the closure, please provide your bank details for the

transfer of any remaining balance under your name. This process may take up to 30 working days. For further assistance,

contact our customer support team at [Customer Support Contact Email].

Sincerely,

[Service User First and Last Name]

[Service User Role]

[Application Name] Compliance Team
User Identification status changed to Review required
Subject: Request for Additional Documentation for Account Review Under AML Compliance
To: User contact email
Message:
Dear [Customer's Name],

We are writing to inform you that your account with [Appliication Name] is currently under review due to matches found in our

watchlists, as part of our Anti-Money Laundering (AML) compliance procedures. To facilitate this review, we kindly

request additional documentation from you. Please upload the required documents through our secure portal at your earliest

convenience to ensure timely completion of the review process. If you have any questions or concerns, please reach out

to our customer support team at [Customer Support Contact Email].

Required Documents:

[list of required document that Compliance manager provide during user identification status change]

Thank you for your cooperation and understanding.

Sincerely,

[Service User First and Last Name]

[Service User Role]

[Application Name] Team
![]() You can change the notification template in the System configuration file (
You can change the notification template in the System configuration file (application.yalm).
![]() See more about available user profile notification
See more about available user profile notification
List of APIs (SDK and SumSub) that are used in KYC verification via 3rd party KYC service provider use case
|
SDK |
SumSub |
||
|---|---|---|---|
|
API |
Description |
API |
Description |
|
View all profile documents |
|
|
|
|
Approve the profile document |
|
|
|
|
PATCH /v1/profile-documents/{profileDocumentId}/users/{userId} |
Update status of user identification document |
|
|
|
POST /v1/profile-documents/{profileDocumentId}/users/{userId}/verify |
Verify the user document via 3rd-party provider |
Create applicant |
This method is used to create an applicant. |
|
Get status of verification steps |
Returns the information about the documents or separate verification step results. used to check status of each document after review completed callback received from SumSub |
||
|
Get applicant by id
|
This method is used to get information about the created applicant. |
||
|
Upload document to SumSub |
This method is used for upload documents for verification. |
||
|
Decline the profile document |
|
|
|
|
Update organization status (user identification status) |
|
|
|
|
To approve user identification status |
|
|
|
|
To create notes about user |
|
|
|
|
To get notes about user |
|
|
|
To start using
-
Make an Agreement with the provider. There is required for the client to make an agreement with the KYC service provider. All features that will be available from the vendor (SumSub) to the client (for both, the source code or cloud clients) depend on the client’s needs and their agreements with the vendor (SumSub).
-
Get credentials from the provider. After the agreement, the service provider provides the client with the credentials to access the Test and Production Environment. Generate API-key on the provider environment and use it for SumSub integration setup.
-
Set up the provider connectivity settings in the SDK system. Set up the system configuration file. (SumSub application token for authentication, SumSub secret key for API authentication, Secret key for webhook signature validation)
-
Activate SumSub KYC service in the SDK Core App. Set up the system configuration (KYC_INTEGRATION_ENABLED,
compliance.document-verification.auto-enabled,compliance.document-verification.provider-name,compliance.document-verification.sumsub-is-enabled). -
Define Default verification level for individual users
User manual on how to verify user`s documents via SumSub on-demand
User manual on how to manage user profile status according to AML check results
![]() See available action for user depending on the profile status and user identification status
See available action for user depending on the profile status and user identification status
![]() See more about available user profile notification
See more about available user profile notification
Technical information
SumSub KYC integration service
Availability
The KYC integration service is a part of the main SDK Core platform application and is included in the package for both models: source code purchasing or SaaS.
It is enabled as a kyc-integration service in the Core platform configuration.
System configuration properties
Check property to confirm, that the kyc-integration service is available and Kafka topic is specified at your system configuration:
kyc-integration:

  service:

    enabled: ${KYC_INTEGRATION_ENABLED:true}

    kafka:

      topic: ${KAFKA_KYC_INTEGRATION_TOPIC:user-profile-data}
Check the following property to configure the flow you need for Sumsub
-
document-verification: provider-name:Available value: sumsub, etc., define the provider for automated verification flow
-
document-verification:auto-enabled:Available value: true/false, on/off automated mode for document verification via 3rd party provider, if
true– always verify via 3rd party provider when conditions are satisfied (see automated flow description). Iffalse– verify via 3rd party provider on-demand only (see manual flow description). Validation required:document-verification:auto-enabled: trueonly ifdocument-verification: provider-name:specified -
document-verification: sumsub-is-enabled:Available value: true/false, define availability of the document verification via Sumsub provide
Kafka instance (dev)
Access
Kafka
Involved topics
-
user-profile-data – submitted data from the user profile
-
KYC_INTEGRATION_KAFKA_UPDATES_TOPIC – verification results (from SumSub and other providers)
Kafka topic`s structure
SumSub
Provider connectivity settings
Settings to connect the SumSub provider system must be specified in the SDK core application configuration settings.
Sumsub-related variables:
SUMSUB_APP_TOKEN: 'sbx:test-token',

SUMSUB_SECRET_KEY: 'test-secret',

SUMSUB_BASE_URL: 'https://api.sumsub.com',

SUMSUB_WEBHOOK_SECRET: 'test-webhook-secret'

LEVEL_NAME_INDIVIDUAL: 'basic-kyc-level'
Authorization
The API uses API keys to authenticate requests. These API keys can be generated within the web platform and must be supplied with each request. When making requests to the API provide your API key in the Authorization header on the API request, e.g. Token YOUR_API_KEY
SumSub response
-
If you received a GREEN response, all is fine; the applicant has been verified. If needed, you can also fetch the applicant data in a separate API call.
-
If you got a RED response and rejectType is FINAL, block the applicant and let them resolve the issue via support. There are only 1-2% of such cases, and it can happen when, for example, there is a fake account or forged documents were used.
-
If you got a RED response and rejectType is RETRY, the applicant has some issues with their documents that can potentially be solved. Refer to Resubmit problematic documents to learn how to fix them.
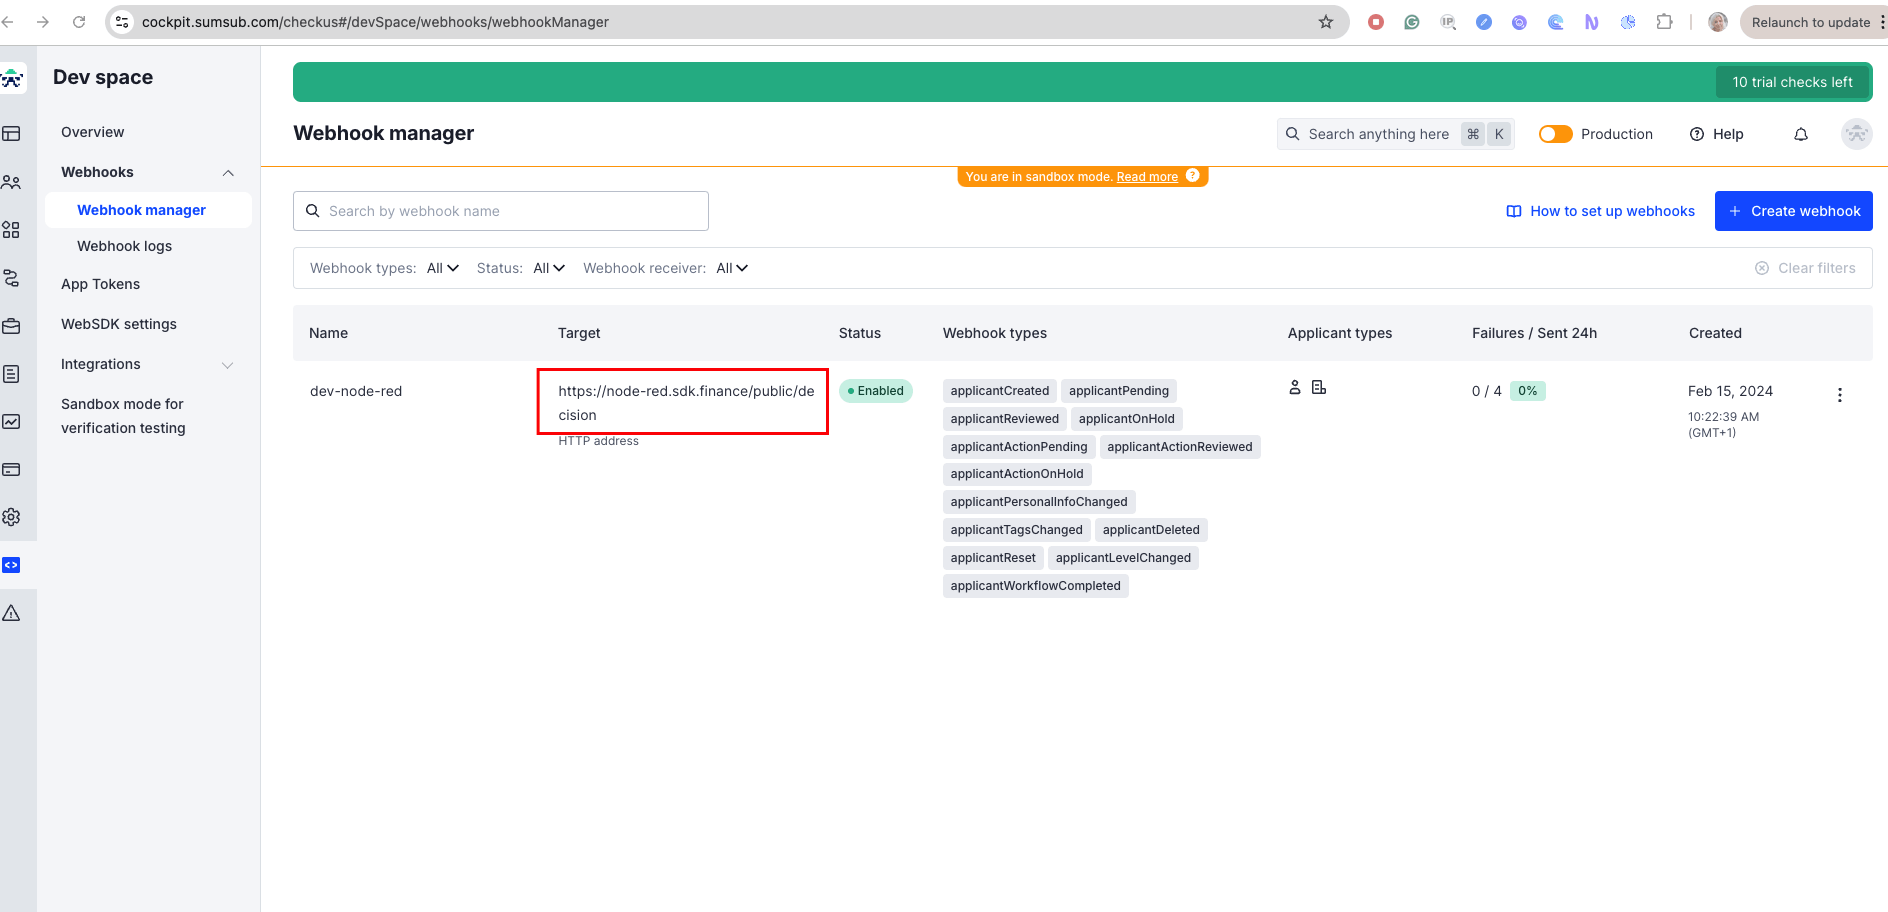
Webhook settings
Webhook URL is set in the Sumsub and should be set to the definite SDK backend instance which is created for the environment.
With the basic configuration there is no ability to set different webhooks for different instances (for example for production, sandbox, and showroom), so if there is a necessity to use Sumsub for sandbox and showroom webhook should be changed. Otherwise, document status will not be updated after Sumsub verification.
User Identification and User document statuses
See more about user identification and user document statuses and their transition
Schemas
General schema for automated flow
Internal schema for automated flow
General for manual flow